Campaigns
Creating a campaign
Campaigns allow you to send personalized outbound emails to your selected leads using your connected mailboxes. Each campaign can contain its own leads, email sequence, schedule, and sending settings. This guide explains how to create a new campaign in Reachingly, step-by-step.
Navigate to Campaigns
- Log in to your Reachingly dashboard.
- Open the Campaigns section from the main navigation.
- Click Create Campaign.

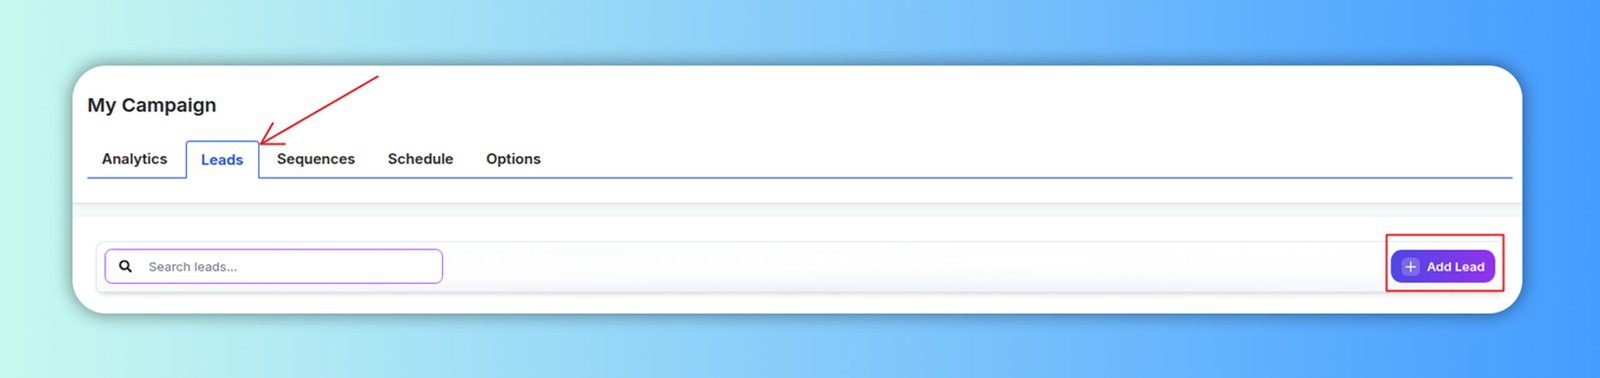
Adding Leads
You can add leads to your campaign by following the steps below:
- Go to the Leads section of the campaign
- Click the Add Lead button
- Choose the preferred method to upload your leads
- CSV upload.
- Manually upload.
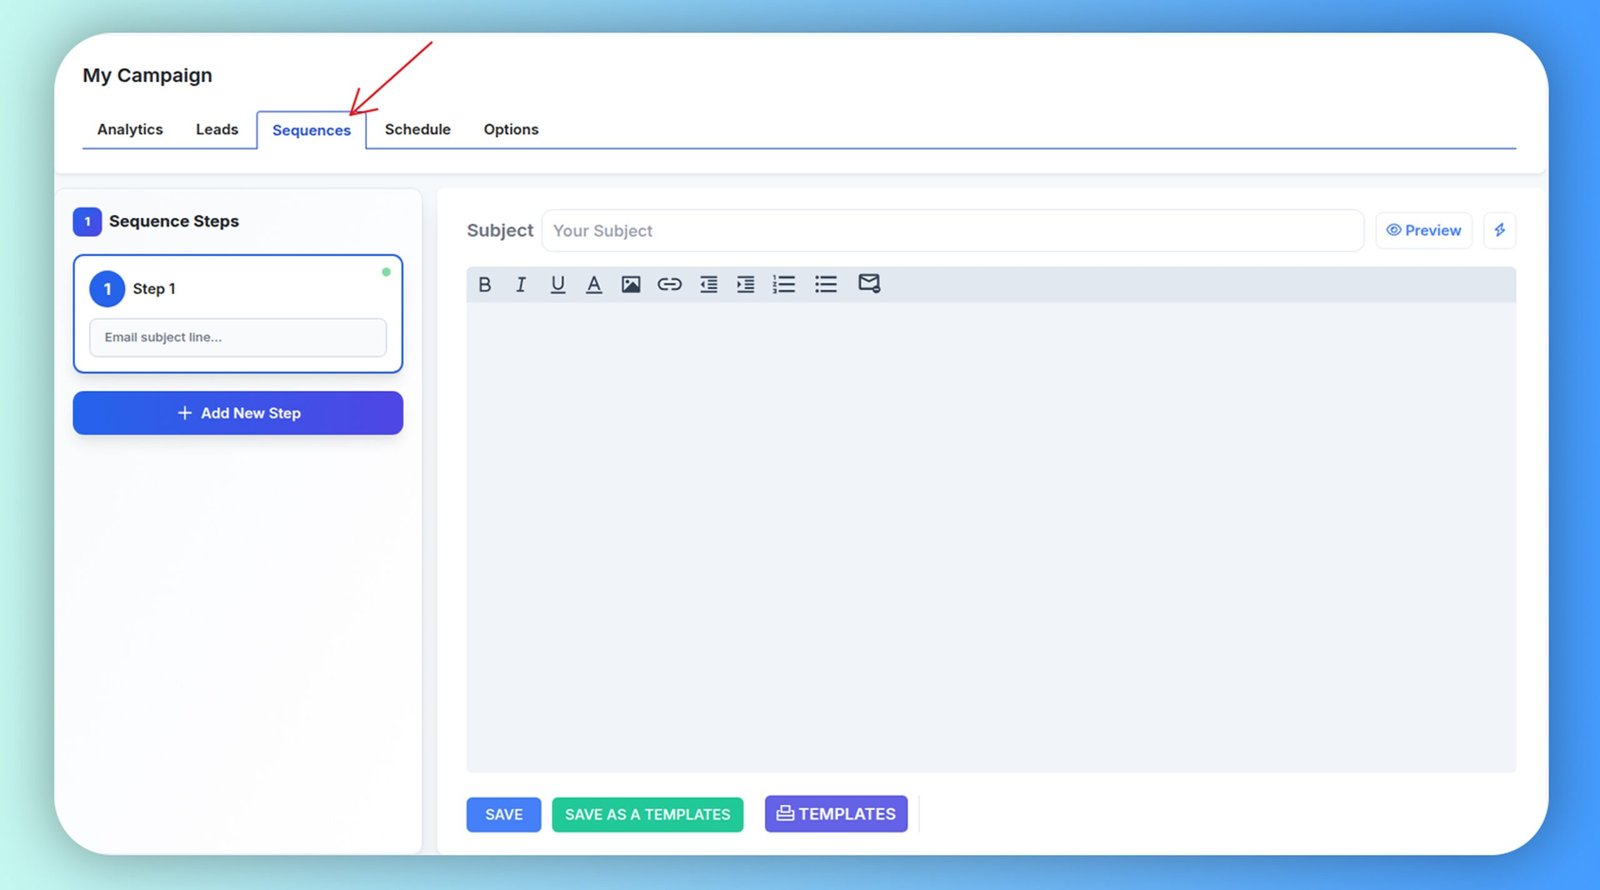
Creating Sequences
The Sequences tab is where you build the emails that will be sent as part of your campaign. Here you can create your main outreach email, add follow-ups, apply delays, and save or reuse templates.
Clicking a step opens the editor to customize:
- Subject line
- Message body
- Formatting (bold, lists, links, images, etc.)
- Custom variables (to personalize messages)
Note: This ensures relevant, human-like messaging for better response rates.
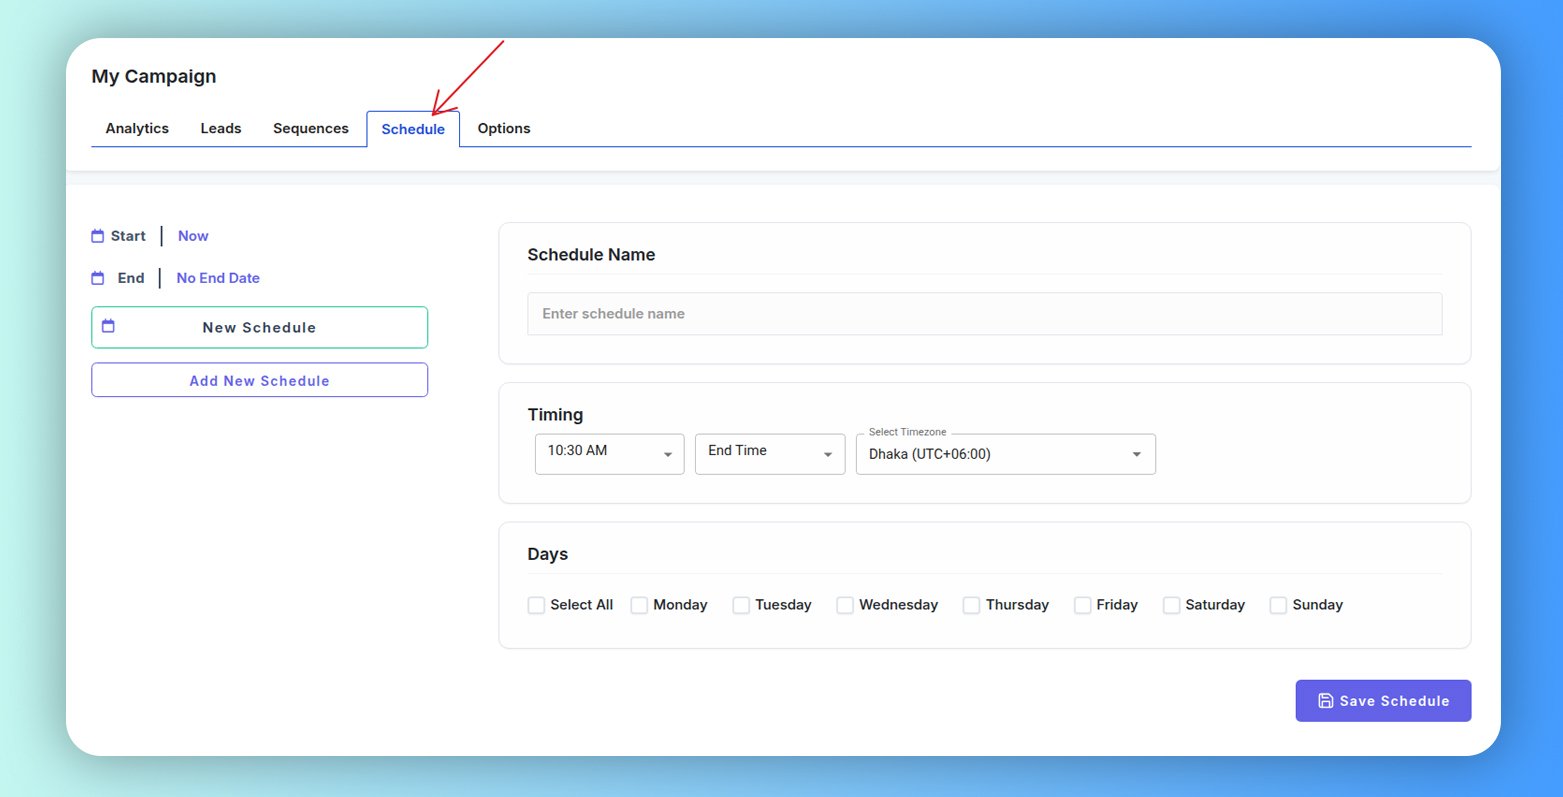
Campaign Schedule
The Schedule tab lets you define the exact days and times your campaign emails can be sent. This helps ensure that outreach happens at the right moment and follows natural sending behavior to protect deliverability.
Reachingly's Schedule system gives you full control over when campaign emails are delivered, helping improve engagement and maintain inbox-safe sending behavior.
Start / End Date Controls
- Specify when your campaign should begin sending.
- Set an end date or keep sending indefinitely with No End Date.
Schedule List Management
- View all active schedules in one place.
- Create multiple schedules using Add New Schedule.
Custom Schedule Naming
- Label each schedule for easier identification.
- Examples: US Business Hours, Weekend Follow-ups.
Time Window Configuration
- Define daily sending windows: Start Time → End Time
- Select timezone for precise delivery.
Sequences section
The Sequences section is where you build the automated email flow for your campaign. A sequence consists of one or more steps—each step being an email that gets sent to a lead based on your timing rules. This allows you to run scalable, multi-touch email outreach without needing to send or follow up manually.
Sequences are essential for improving reply rates, maintaining consistent messaging, and nurturing prospects over time.
What You Can Do in Sequences
- Create your initial outreach email
- Add multiple follow-up steps
- Set delays between messages
- Personalize messaging
- Preview email content
- Save or load templates
- Organize step order
Interface Overview
When you open the Sequences tab, you will see two primary areas:
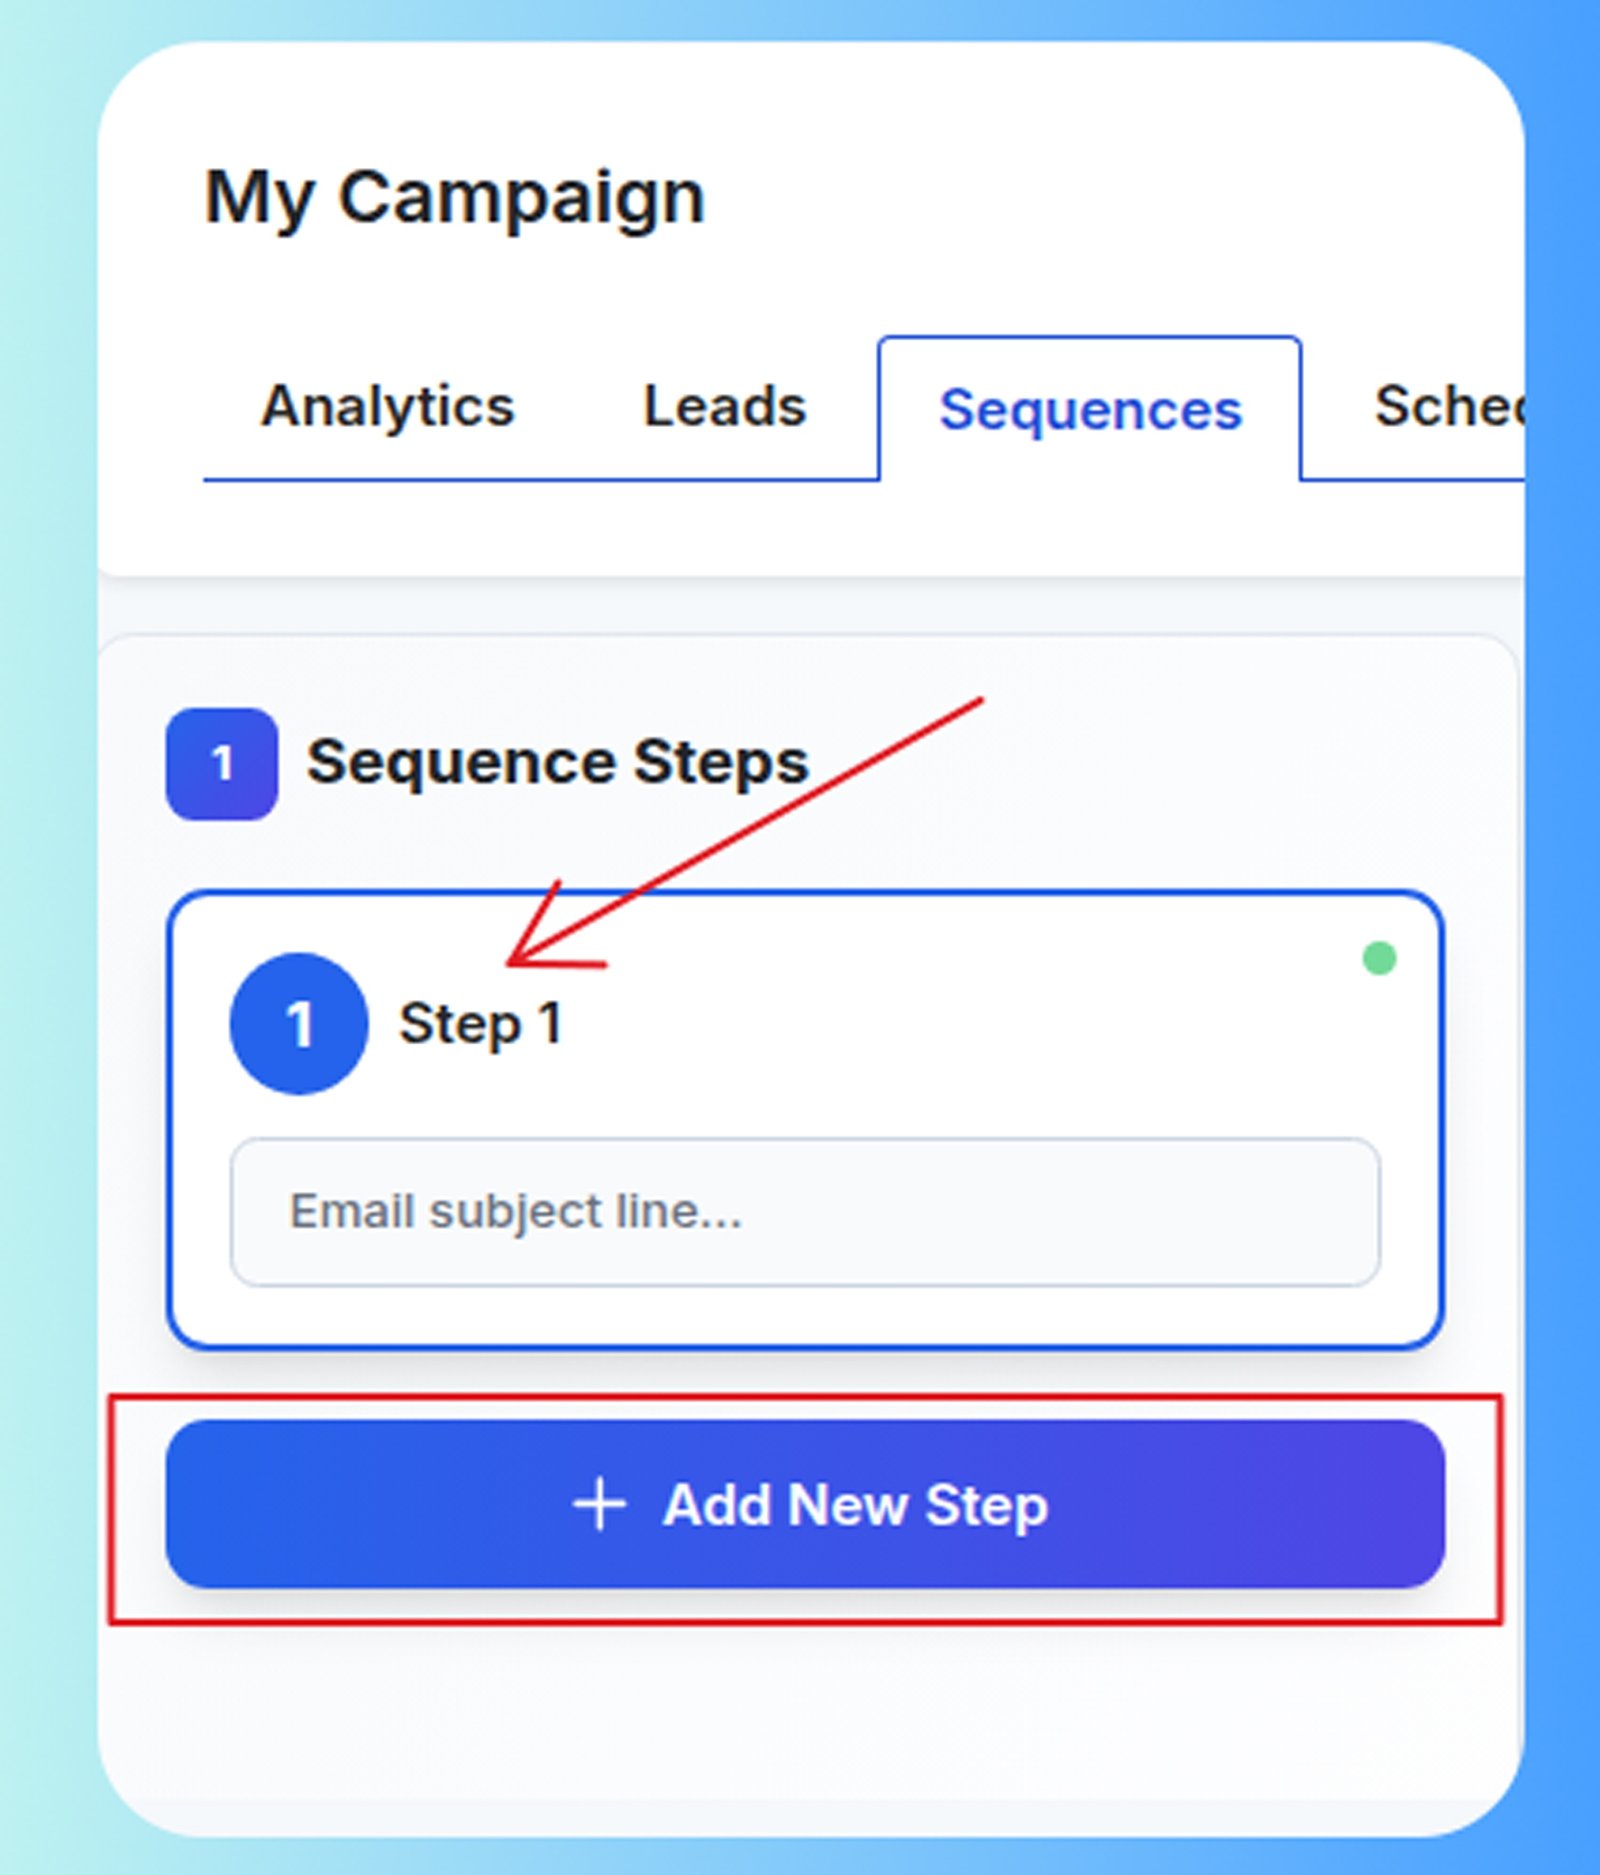
1️⃣ Sequence Steps Panel (left)
This panel lists the emails in your flow.
- Step 1 — Your first outreach email
- + Add New Step — Add follow-up messages
- Click any step to edit it
- Steps are sent in order from top to bottom
- Each step displays:
- Step number
- Subject line preview
- Health/validity status
You may create as many steps as your outreach strategy needs.
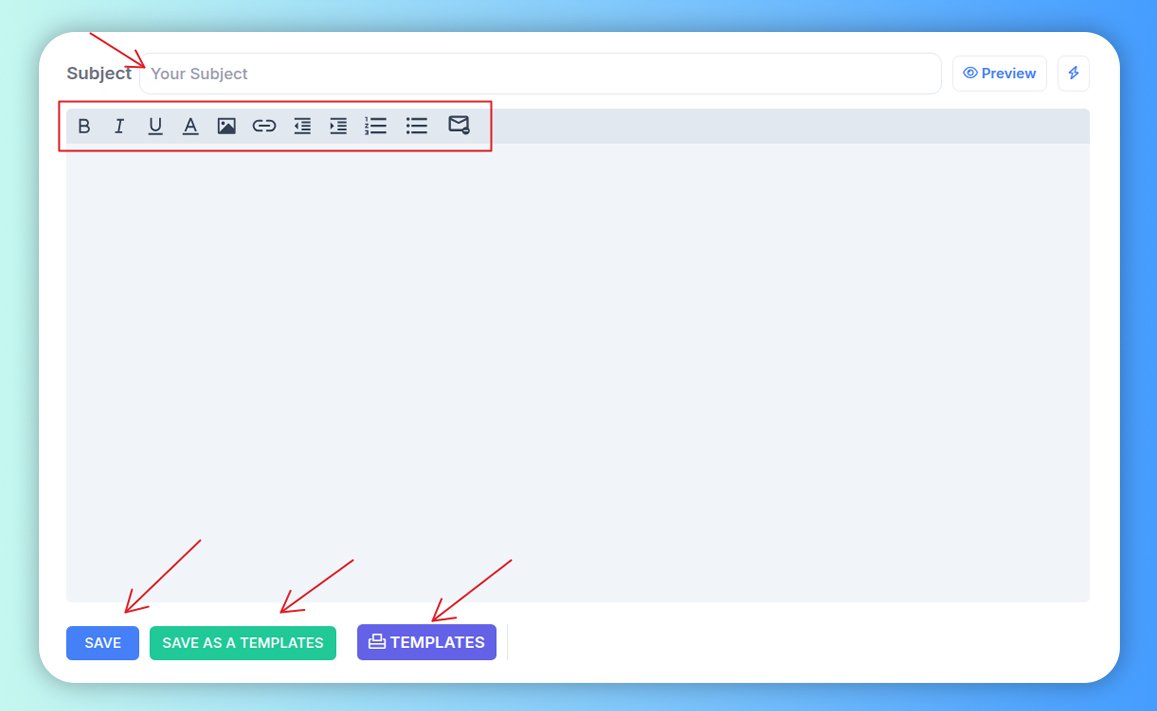
2️⃣ Email Composer (right)
This is where you write and customize your email content.
Key elements:
- Subject Line field
- Rich Text Editor
- Bold / Italic / Underline
- Hyperlinks
- Images
- Lists (ordered / unordered)
- Text alignment
- Preview Button — Preview email before saving
- Action Buttons
- Save
- Save as Template
- Templates (Load from library)
The editor supports natural formatting to help your outreach feel more human and authentic.
Adding Steps (Follow-Ups)
To add follow-ups:
- Click + Add New Step
- A new step is added under Step 1
- Enter subject + message content
- Define delay (e.g., 2 days after prior email)
Follow-ups stop when a lead:
- Replies
- Unsubscribes
- Bounces
- Reaches end of sequence
You can reorder steps as needed.
Writing Your Email
Each step requires:
- Subject line
- Email body
You can personalize emails using merge variables such as:
- First name
- Company
- Custom fields
This increases relevance and response rates.
Best practices:
- Keep emails short
- Start conversationally
- Avoid heavy graphics or spam phrases
- Include one call-to-action
Previewing Emails
Click Preview to see how your email will look to recipients before sending.
Preview helps you:
- Spot formatting issues
- Verify personalization fields
- Confirm signature formatting
Using Templates
The Templates system saves time and ensures consistency.
➜ Save as Template
Store your current step for future reuse.
➜ Templates button
Opens your template library, where you can:
- Select saved templates
- Insert into a step
- Modify before saving
Templates are great for repeated use cases like:
- First outreach email
- Follow-up messages
- Product pitches
Recommendations for Strong Sequences
- Keep Step 1 very personalized
- Add 2–4 follow-ups spaced 2–5 days apart
- Maintain conversational tone
- Use social proof or CTA in later steps
- Vary message formats (short, CTA, value-add)
Example structure:
- Step 1: Intro + value
- Step 2: Soft follow-up + CTA
- Step 3: Introduce proof or resource
- Step 4: Final bump — short CTA
When Emails Stop Automatically
A sequence automatically stops for a lead when:
- They reply
- They unsubscribe
- The sequence ends
This ensures leads are not over-contacted and reduces spam risk.
Why Sequences Matter
- Maintain consistent follow-ups
- Save manual outreach time
- Boost response rates
- Keep messaging structured and relevant
- Ensure every lead is properly nurtured
Note: The Sequences tab is the core execution engine of your campaign. Use it to design thoughtful, multi-step outreach flows that communicate value, build trust, and convert more leads into conversations.
How to add variables?
Personalization variables allow you to insert dynamic data—such as first name, company name, or custom fields—into your email subject line and body. These values are automatically replaced for each lead when a campaign runs.
1) Add Variables When Importing Leads (CSV)
When uploading a CSV file:
- Go to Leads → Upload CSV
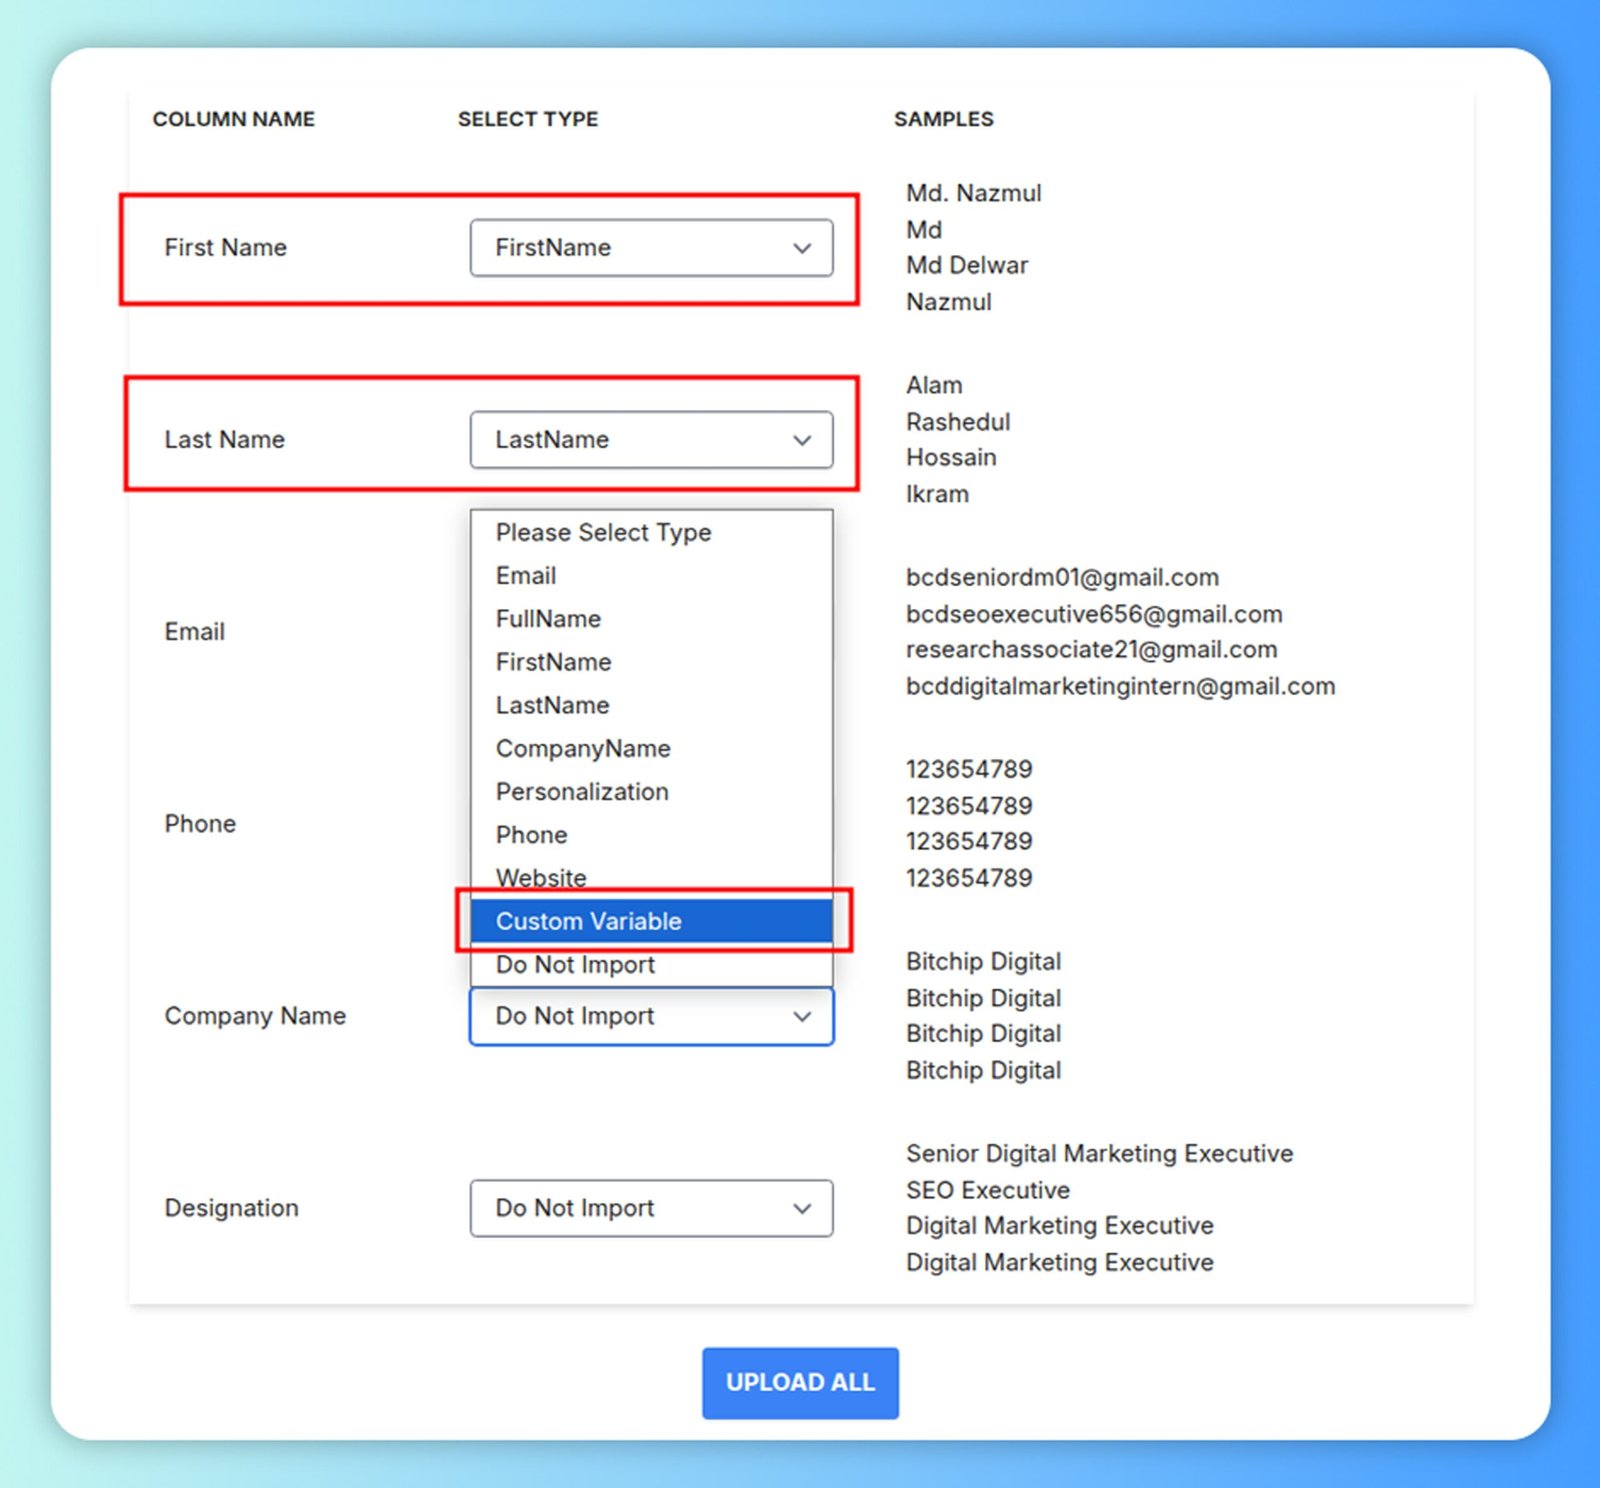
- Match each column to a field under Select Type
Example:
- First Name → FirstName
- Last Name → LastName
For additional custom fields, choose Custom Variable
After mapping, click Upload All.
These mapped headers will now be available as variables in your sequences.
Supported examples:
- first_name
- last_name
- company_name
- designation
- phone
- custom variables
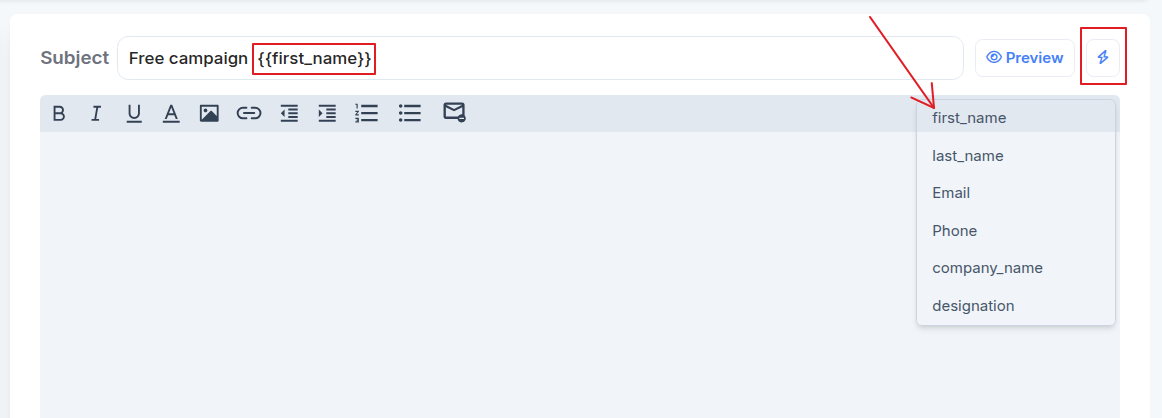
2) Insert Variables in Subject Line
To insert a variable into the subject line, click on the bolt icon next to the top-right Preview button.
- Click the ⚡ (variable) button
- Choose a variable from the dropdown
- It will auto-insert like: {{first_name}}
Example: Free campaign for {{first_name}}.
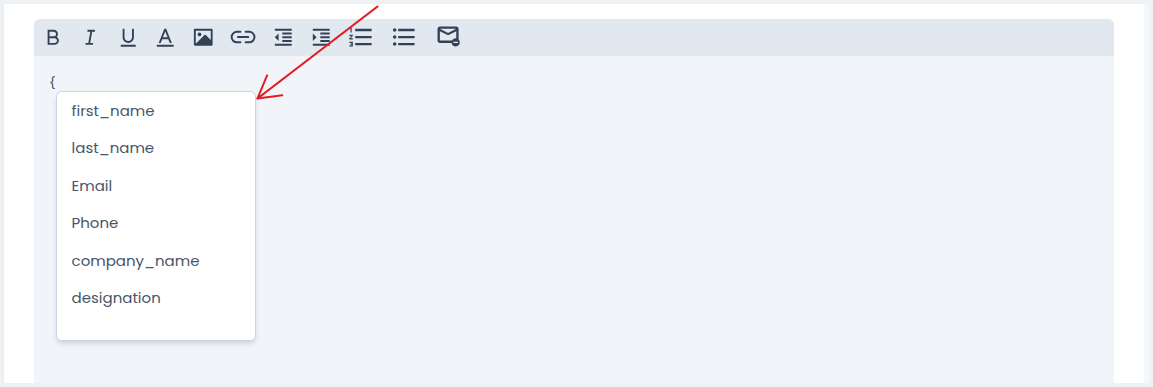
3) Insert Variables in Email Body
To insert a variable into the email body:
- Type { to open variable suggestions
- Select the desired variable
- It will automatically insert the placeholder
Example:
Hi {{first_name}},
I noticed your work at {{company_name}}
Note: Always ensure your CSV data is clean and correctly mapped so variables populate accurately.
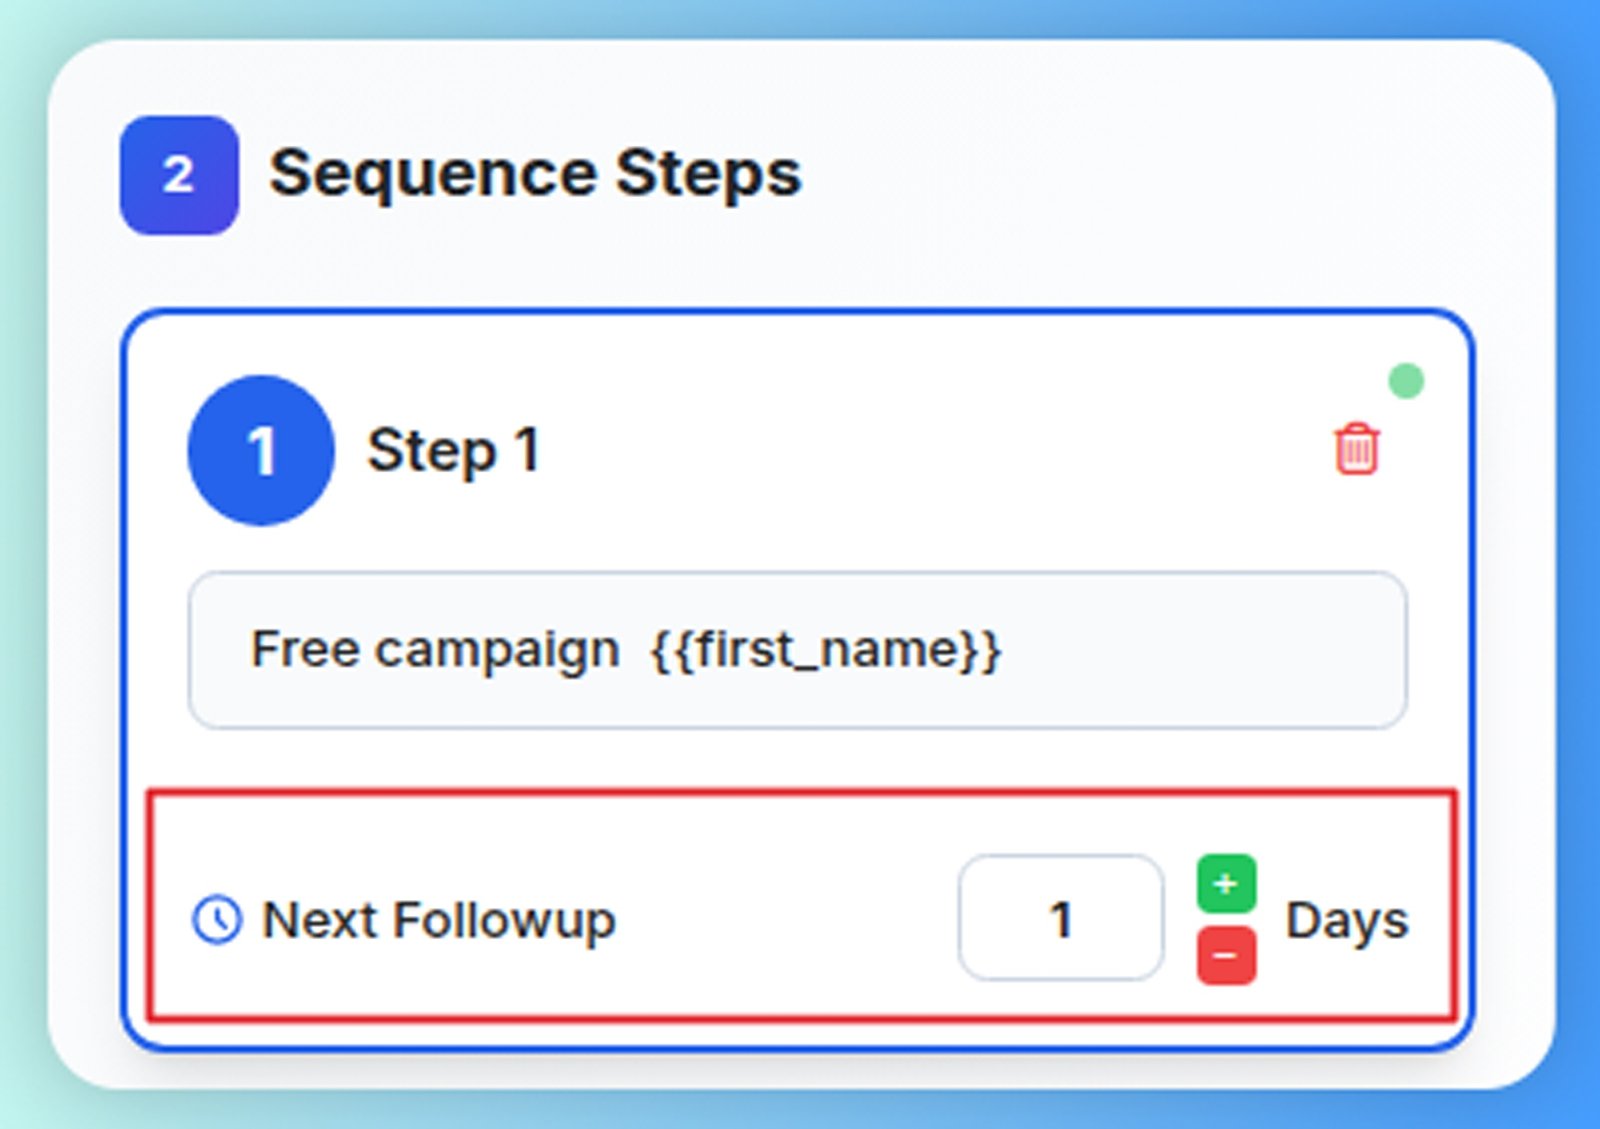
Days to wait between steps
The "Days to wait between steps" setting determines how long Reachingly should wait before sending the next follow-up email in your sequence.
This delay is counted in calendar days, but messages are only sent on active sending days based on your campaign schedule.
If the calculated day falls on a non-sending day (e.g., weekend), Reachingly will automatically move the send to the next available scheduled day—ensuring natural, compliant sending behavior without interruptions.
How It Works
- You define an interval such as 2 days, 3 days, etc.
- Reachingly counts forward that many days from the previous email.
- If the resulting day is not an active sending day, the system looks forward until it reaches the next available active day on your campaign schedule.
- The next step is delivered on that date within your configured time window.
This ensures your follow-ups never go out on days when your campaign is paused, such as weekends or holidays (based on settings).
Example Scenarios
Example 1
- Schedule: Monday → Friday (Weekend disabled)
- Delay: 2 days between Step 1 & Step 2
- Step 1 Sent: Friday
Day Calculation:
| Day | Status |
| Saturday | Not scheduled |
| Sunday | Not scheduled |
| Monday | Next active day |
✅ Step 2 will send on Monday
Even though 2 calendar days pass (Sat + Sun), Reachingly waits until the next available sending day (Monday).
Why This Matters
- Avoids sending on weekends or off-hours
- Protects deliverability by keeping volume natural
- Makes follow-ups respectful of lead availability
- Allows campaigns to run smoothly without manual adjustments
- Ensures consistency with your time-zone & business-hour settings
Best Practices
- Use 2–4 day intervals for B2B outreach
- Align delays with your target audience's work schedule
- Keep sending windows within local business hours
- Monitor engagement and adjust delay timing accordingly
Reachingly ensures your follow-ups always send on schedule, within working days, and with natural timing, helping you drive engagement responsibly and effectively.
Sequence Templates
Reachingly allows you to save, manage, and reuse email templates across campaigns. Templates help you streamline your workflow, maintain consistent messaging, and save time when creating new sequences.
You can use:
- ✅ Ready-made templates
- ✅ Templates you create yourself
Using Reachingly Templates
Reachingly provides a growing library of pre-built templates across different outreach categories—such as marketing, B2B agencies, and general cold outreach. These templates include both a subject line and message body, which you can customize to fit your needs.
🔹 How to Use a Template
- Open your campaign → Sequences tab
- Click the Templates button
- Browse and select a template
- Click Use Template
- The template will load into your sequence editor (subject + body)
- Edit as needed and save
✅ You can apply templates to any step in a sequence.
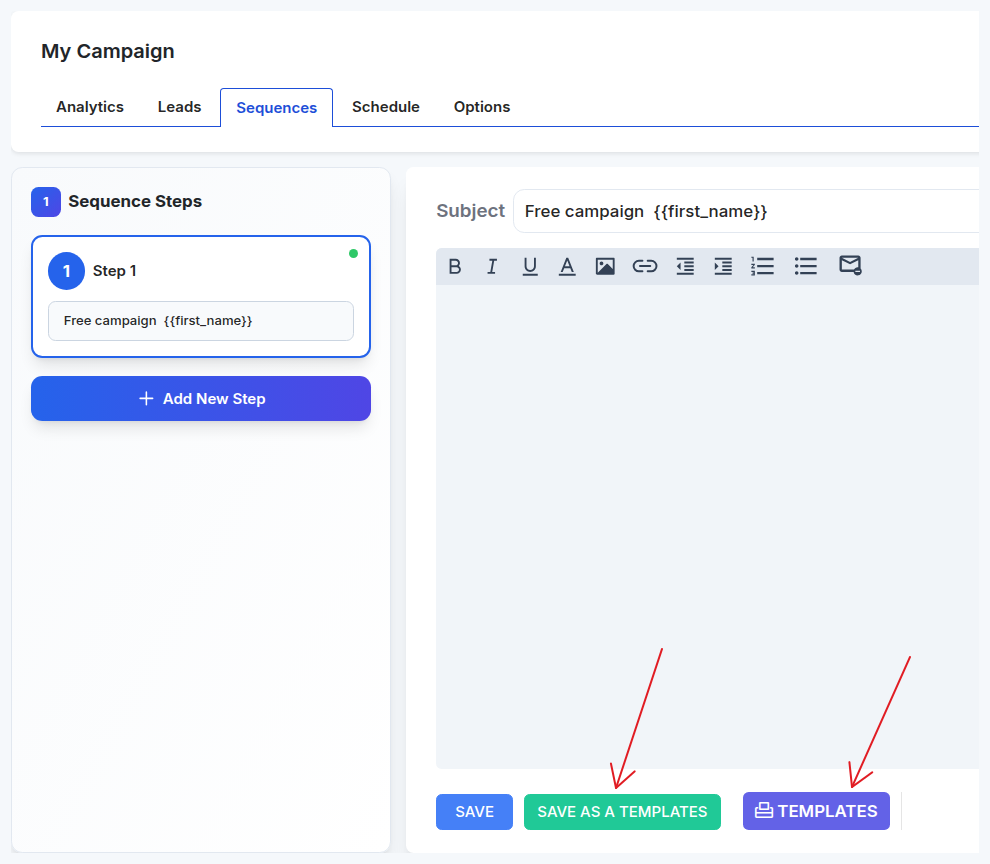
Creating Custom Templates
If you frequently reuse messaging, you can save your own emails as templates for future outreach.
🔹 How to Create a Custom Template
- Open the Sequences editor
- Write your email subject + body
- Click Save as a Template
- Enter a name for your template
- Click Add Template
Your new template will now appear in the Templates list and can be reused at any time.
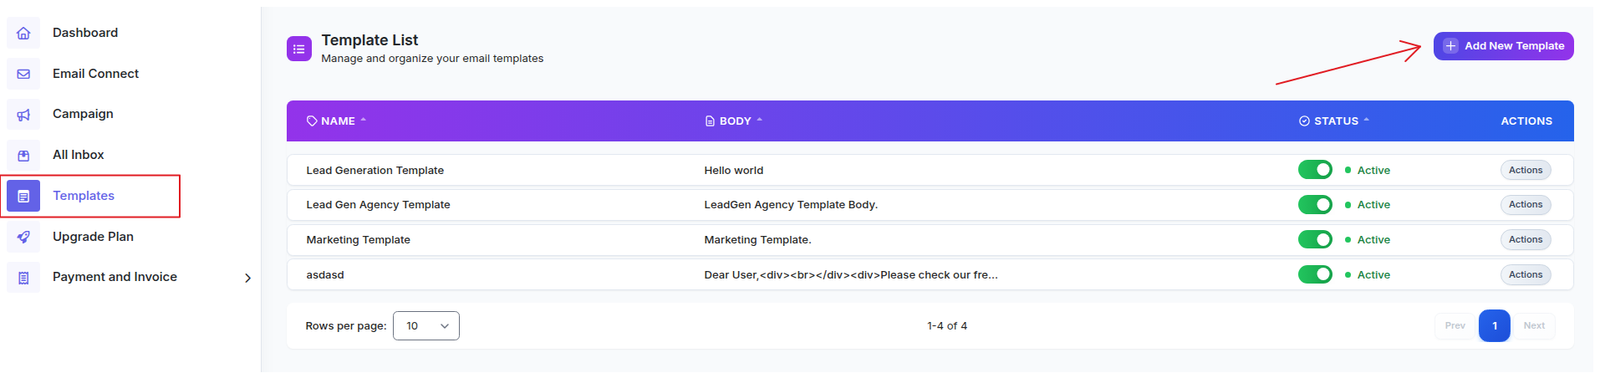
Managing Templates
To view and manage all stored templates:
- Go to the left navigation menu → Templates
Here you can:
- View template list
- Edit templates
- Enable/disable (Active/Inactive)
- Apply to campaigns
- Delete if no longer needed
- Filter and organize templates
This centralizes template management so you can quickly update messaging across campaigns.
Benefits of Using Templates
- ✔ Saves time when building new campaigns
- ✔ Ensures messaging consistency
- ✔ Eliminates repetitive writing
- ✔ Allows fast A/B experimentation
- ✔ Helps teams share effective copy
How To Add Images?
You can insert images into your sequence emails to make them more engaging.
Because many email providers block unsafe or untrusted image sources, it's important to host images properly before adding them to Reachingly.
Follow the steps below to ensure your images display correctly.
Step-by-Step Instructions
1) Host Your Image Online
Reachingly requires your image to be publicly accessible through a valid URL.
Recommended hosting options:
- Google Photos
- Imgur
- Dropbox (public link)
- Your own website / CDN
Note: For best deliverability and stability, Google Photos is recommended.
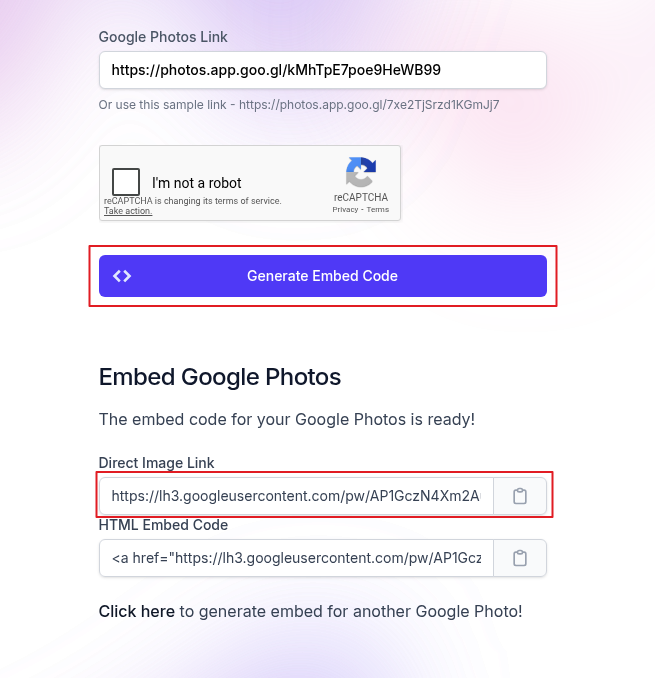
2) Generate a Direct Image Link (Google Photos Method)
- Upload your image to Google Photos
- Click Share → Create Link
- Copy the share link
- Convert the share link to a direct image link
You may use any reliable online converter
- Paste your shared link → Generate Embed Code
- Copy the Direct Image URL
This is the link you will insert into Reachingly.
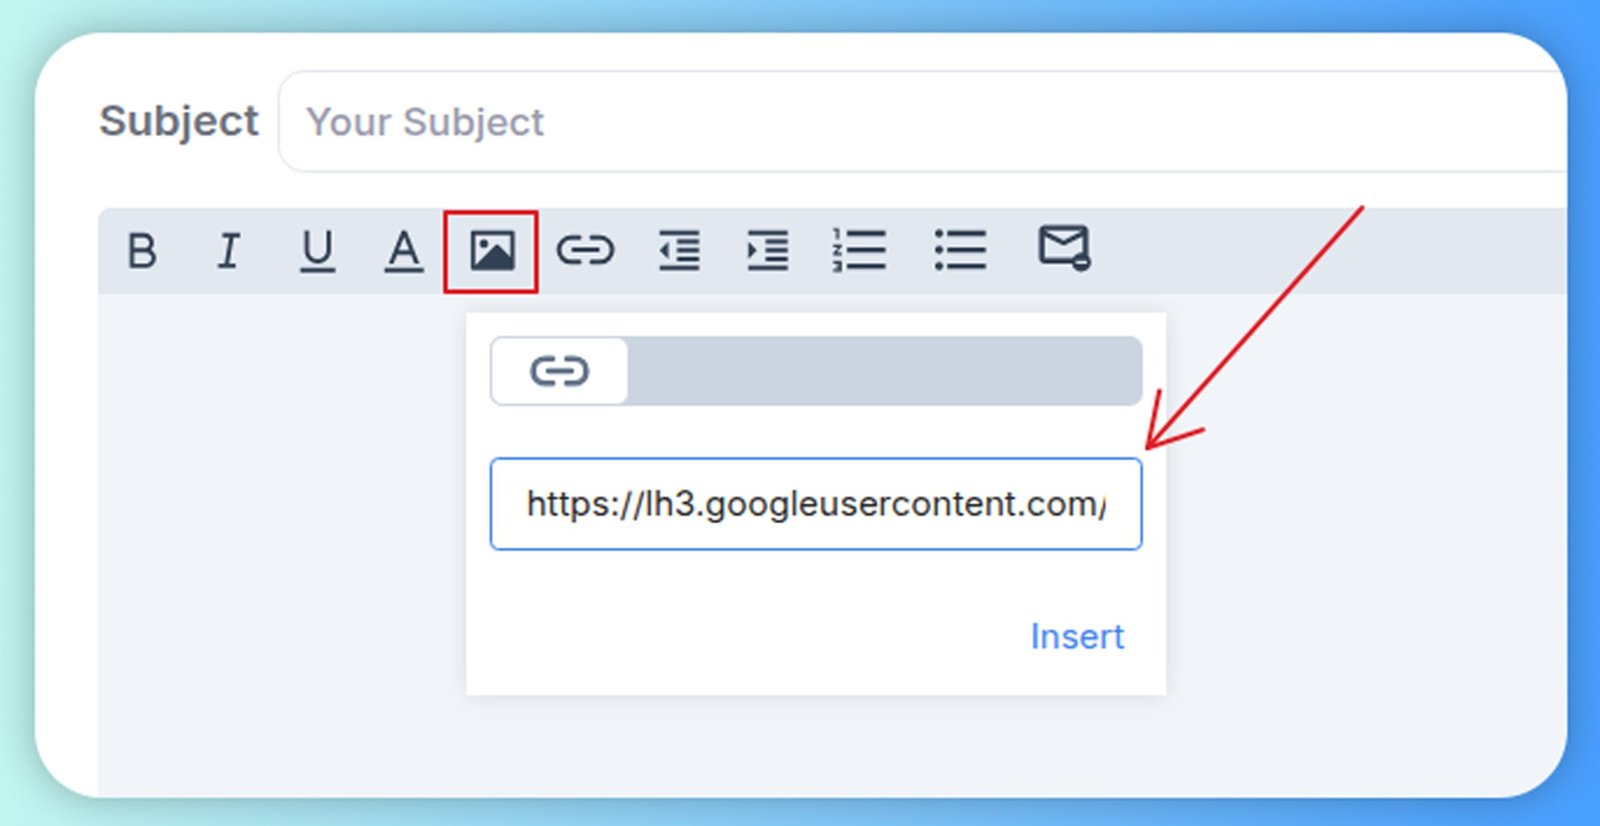
3) Insert the Image in Your Sequence
- Open your campaign → Sequences
- Go to the step where you want to add an image
- Click the Image icon
- Paste your Direct Image URL
- Click Insert
Your image will appear in the editor.
If Your Image Doesn't Display
If the image shows as broken or missing:
- Check the link
- ✅ Must be a direct URL ending with .jpg, .png, .gif, etc.
- ❌ Not a page link (example: google.com/photo/xyz)
- Check Campaign Settings
- Some features can strip images to improve deliverability.
- Disable the following if needed:
- ✅ Options → Delivery Optimization
- If enabled, this may remove images to send text-only messages.

Best Practices
- ✔ Use lightweight image files (under 200–300 KB)
- ✔ Host on trusted domains to avoid spam filtering
- ✔ Avoid using too many images—keep messaging natural
- ✔ Use alt text for better accessibility
- ✔ Test your email before sending to live prospects
Adding Signature
Email signatures help reinforce your identity, improve trust, and provide recipients with a clear way to contact you.
Reachingly allows you to manage signatures at the account level and automatically insert them inside your campaign sequences.
This is especially helpful when using multiple sending accounts under one campaign, ensuring each email contains the correct sender information.
Why Use Account-Based Signatures?
If you send campaigns from different inboxes (ex: multiple team members), each account may need:
- A unique name
- Different contact details
- Company role
- Branding elements
- Social links
Reachingly makes this easy by letting you configure a signature for each connected account and insert it dynamically into your campaign using a variable.
How It Works
Each email account connected to Reachingly can store its own signature.
When you send emails inside a campaign, you can insert a variable that automatically pulls the correct signature depending on which account sends the message.
- No need to manually copy signatures into every step
- No risk of mismatched sender identity
Steps to Add / Edit a Signature
1) Open Email Account Settings
- Go to Email Connect
- Select the sending account you want to configure
- Click Settings (opens the configuration window)
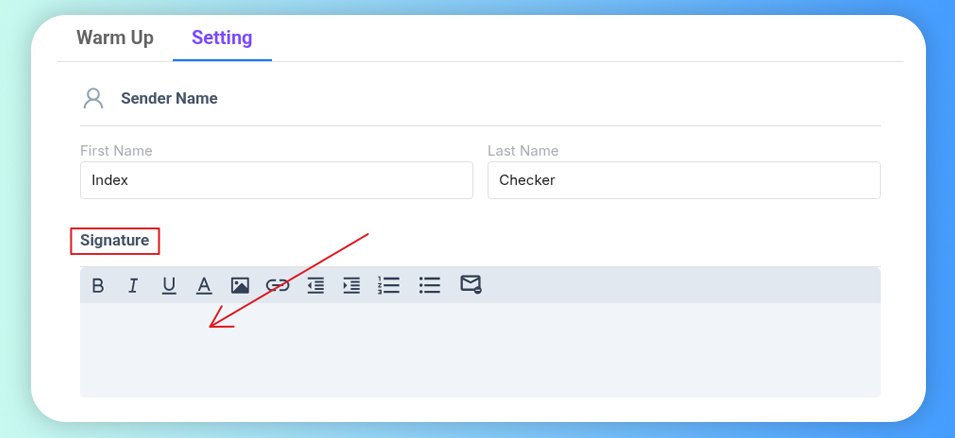
2) Create Your Signature
Inside the signature editor:
- Enter your desired signature text
- Add optional elements:
- Images (ex: headshot, logo)
- Links (website, social profiles)
- Formatting (bold, underline, bullets)
Advanced formatting + image support included
Spintax supported for signature variations
3) Insert Signature in a Campaign Sequence
Once your signatures are set:
- Open your Campaign → Sequences
- In the body of email click the " { "
- Select {{Signature}}
This variable will be placed wherever your signature should appear.
Result
When a campaign sends emails from different sending accounts:
- Each email will automatically use the signature tied to that specific account.
- Ensures correct personal & business information is always shown.
Adding Leads To A Campaign
Leads are the contacts you want to reach through your campaign.
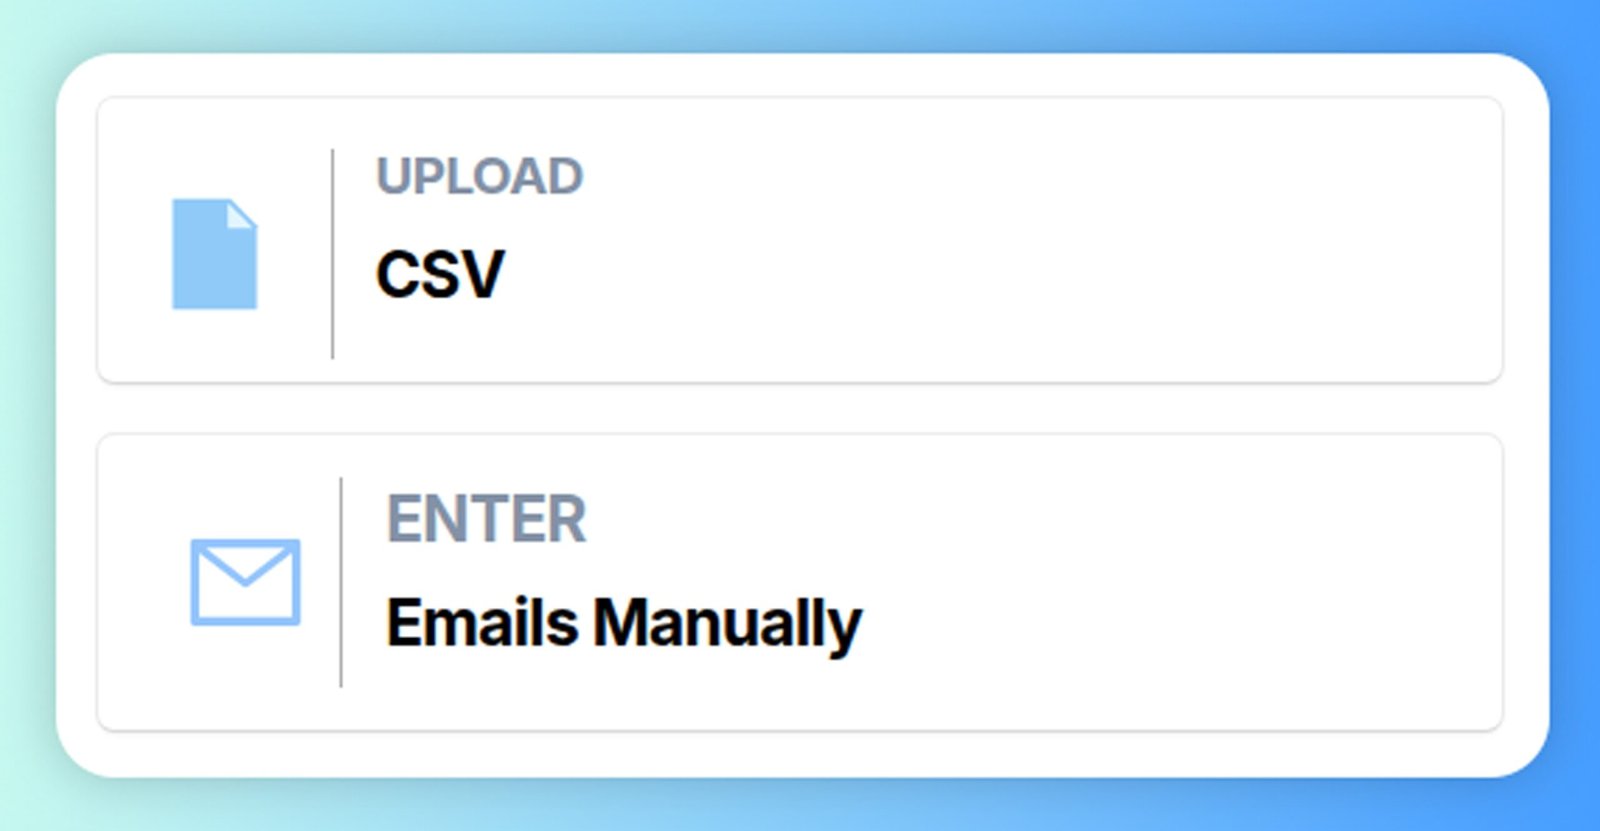
Reachingly allows you to add leads in two ways:
- Uploading a CSV file
- Manually entering emails
Both methods support personalization fields so you can send highly targeted messaging.
Accessing the Leads Section
- Open your campaign
- Navigate to the Leads tab
Here, you can:
- View all imported leads
- Sort by name, company, email, etc.
- Search for individual records
- Add or update contact details
- Take action on specific leads

Method 1 — Upload CSV
CSV import allows you to upload many leads at once while mapping fields to personalization variables.
🔹 Steps
- Go to Leads → Add Lead
- Select Upload CSV
- Choose your CSV file
- Map each column to a field (example: First Name → FirstName)
- For additional columns, select Custom Variable
- Click Upload All
Your leads will now appear in the campaign's leads table.
Method 2 — Enter Emails Manually
If you only have a few leads, you can add them manually.
🔹 Steps
- Go to Leads → Add Lead
- Select Emails Manually
- Enter the lead details
- Save
The new lead will be added to your campaign instantly.
Best Practices
- ✔ Keep CSV column names clean
- ✔ Avoid duplicates
- ✔ Verify email formatting
- ✔ Add at least first_name + company_name for personalization
- ✔ Use custom variables for deeper personalization
Multiple schedules
Multiple Schedules
Reachingly allows you to create multiple sending schedules within a single campaign.
This gives you maximum flexibility when planning your outreach—especially if you want emails to be delivered at different times on different days.
Multiple schedules are ideal when:
- You want different time windows on certain days.
- You want separate blocks for different time zones.
- You want to adjust sending behavior based on audience habits.
Why Use Multiple Schedules?
Every audience behaves differently.
Sometimes, sending at the same hour each day isn't ideal.
With layered schedules, you can:
- ✔ Avoid early-week overload (e.g., slow Monday mornings)
- ✔ Target different time zones separately
- ✔ Schedule multiple send windows per day
- ✔ Run test sending windows for optimization
Example:
You may want to send emails later on Mondays (10 AM) but earlier Tuesday–Friday (8 AM).
Multiple schedules let you configure this in one campaign.
How To Create Multiple Schedules
- Open your campaign
- Go to the Schedule tab
- Click Add New Schedule
- Enter a schedule name (ex: "US Morning Window")
- Configure:
- Start & End time
- Time zone
- Days of the week
- Click Save Schedule
- Repeat to add more schedules if needed
Once added, schedules appear in the left panel, stacked as layers.
How It Works
Each created schedule acts as an additional sending window.
Reachingly will only send emails during the active windows defined across your schedules.
➡ If multiple schedules overlap, emails may send during both active windows.
➡ The campaign stops sending whenever no active schedule is available.
This ensures your outreach aligns with recipient time preferences and business hours.
Best Practices
- ✔ Group schedules by time zone
- ✔ Use meaningful names (ex: "US Morning," "EU Afternoon")
- ✔ Keep business-hour ranges to maximize engagement
- ✔ Don't create overly fragmented schedules unless needed
Account and Campaign limits
Reachingly gives you full control over how many cold emails are sent per day—both at the account level and campaign level.
These limits help protect your inbox reputation, prevent sending spikes, and maintain healthy deliverability.
There are two types of limits you can set:
Account Limit (Per Email Account)
The Account Limit defines the maximum number of cold emails a single sending account can send per day, across all campaigns.
➡ Warm-up emails are NOT counted.
This ensures each inbox stays within safe daily sending ranges.
Why Account Limits Matter
- Prevents accounts from being overloaded
- Protects deliverability and reputation
- Ensures balanced distribution when using multiple senders
Where to Set Account Limit
- Go to Email Connect
- Click the email account you want to configure
- Open the Settings panel
- Find Daily Campaign Limit
- Set the daily number of cold emails (recommended: maximum 30 per account per day)
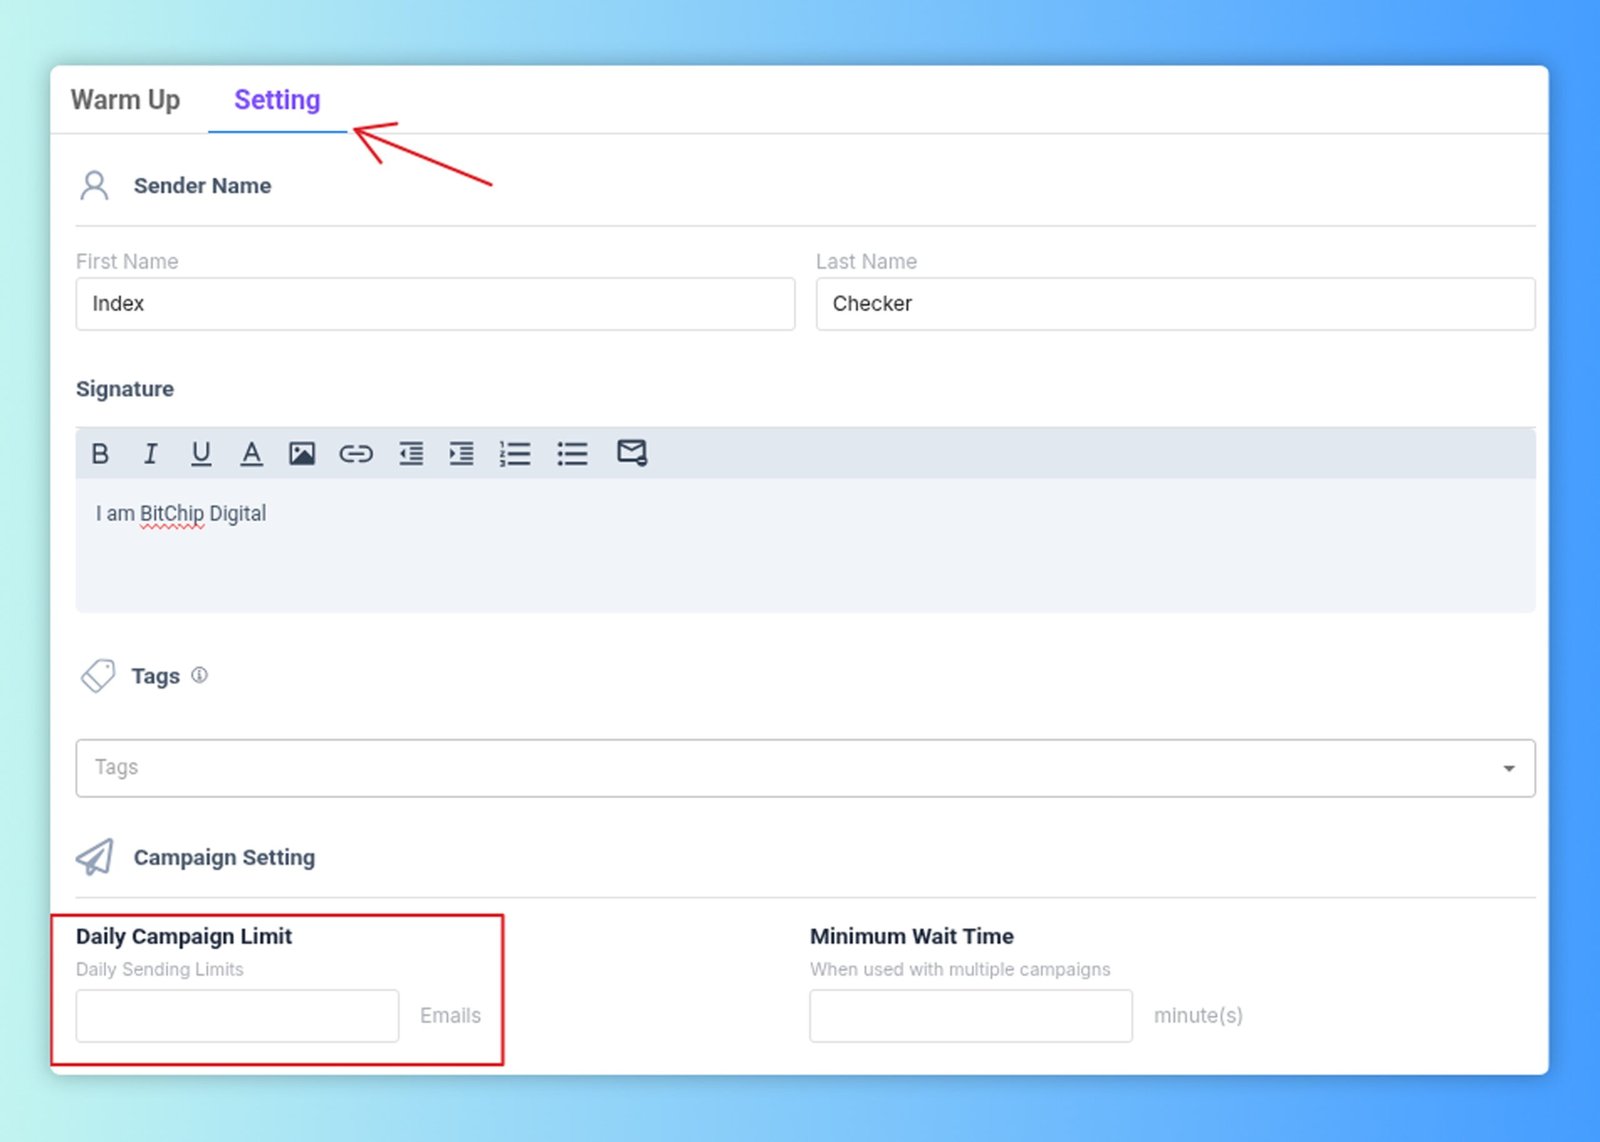
Minimum Wait Time
You'll also see Minimum Wait Time, which:
- Creates an additional cooldown period between emails when one account is used in multiple campaigns
- Default: 1 minute
- The account won't send emails in another campaign until the wait time is completed
This protects against unnatural sending bursts.
Campaign Limit (Per Campaign)
The Campaign Limit defines the maximum number of emails that can be sent per day, from all sending accounts combined, in a specific campaign.
➡ Warm-up emails are NOT counted.
Why Campaign Limits Matter
- Controls total daily volume
- Allows scaling while staying inbox-safe
- Balances the sending load across all accounts in the campaign
Where to Set Campaign Limit
- Open your campaign
- Go to the Options tab
- Scroll to Daily Campaign Limit
- Enter your desired total daily sending cap

Example Scenario
You want to send 300 emails/day for a campaign, but each account should only send 30/day.
Solution:
- Set Campaign Limit → 300
- Set Account Limit → 30 for each account
- Total needed accounts → 10 accounts
Reachingly will automatically distribute the daily sending across all connected accounts.
Best Practices for Limits
- ✔ Keep account limits low (20–30 per day) for new domains.
- ✔ Increase limits gradually over time.
- ✔ Always pair limits with warm-up periods.
- ✔ Avoid setting campaign limits higher than total (account_limit × number_of_accounts).
- ✔ Use Minimum Wait Time to space sending activity naturally.
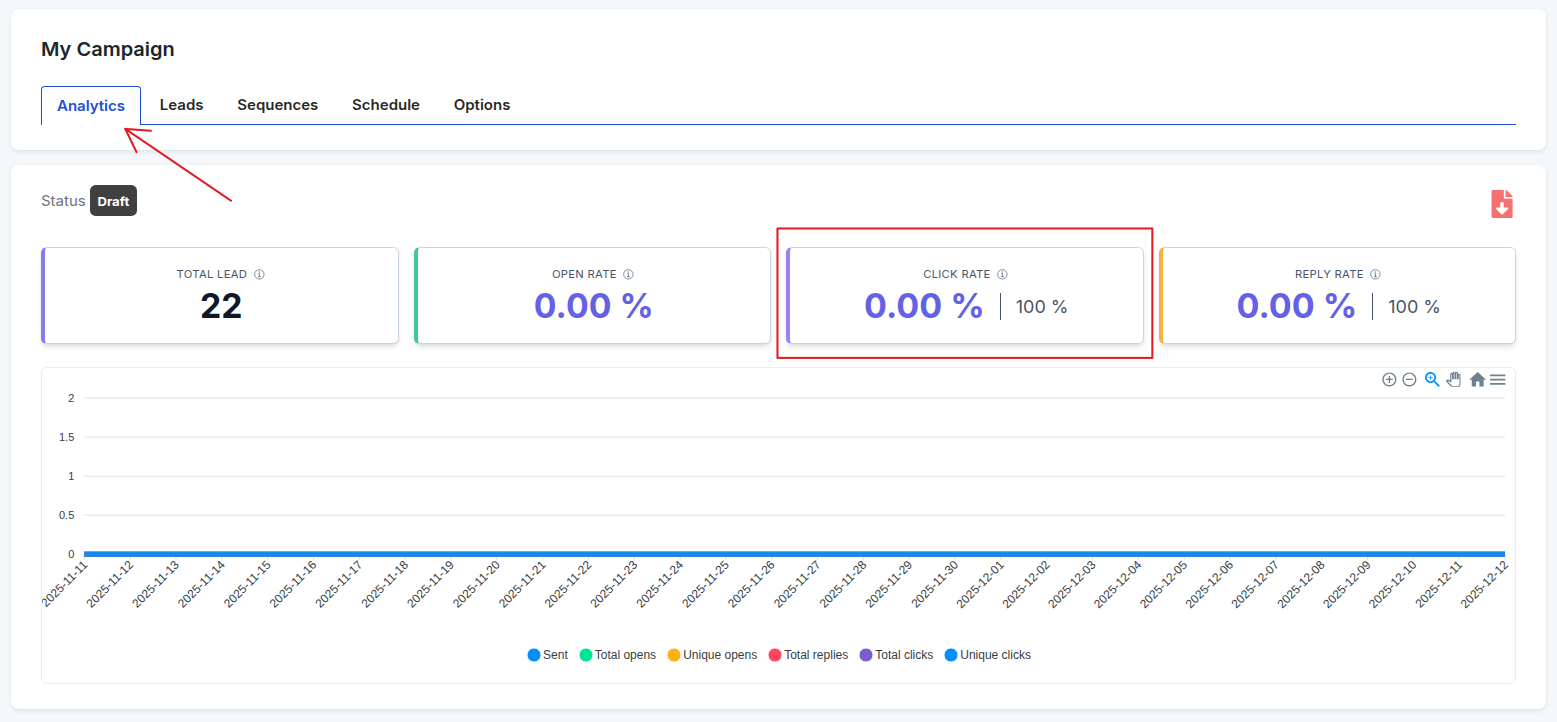
Link Clicks Tracker
Reachingly allows you to track when a lead clicks any link inside your campaign emails. Link click tracking helps you measure engagement, identify high-intent leads, and optimize your outreach strategy.
When enabled, Reachingly rewrites your email links in a safe and compliant way, allowing you to see exactly who clicked, when they clicked, and how many total/unique clicks your campaign generated.
How to Enable Link Tracking
Link tracking is controlled from your campaign's Options panel.
🔹 Steps:
- Open your campaign
- Navigate to the Options tab
- Scroll to Link Tracking
- Choose Enable to activate click tracking
- Save your campaign settings
Once enabled, any link inside your Sequence emails will be tracked automatically.
Note: If Link Tracking is disabled, Reachingly will not record clicks, and your analytics will show 0% click rate.
Why Enable Link Tracking?
Turning on link tracking allows you to:
- ✔ Identify leads showing interest
- ✔ Measure CTA effectiveness
- ✔ Test different versions of emails (A/B tweaks)
- ✔ Prioritize follow-ups with engaged leads
- ✔ Understand which links drive the most traffic
- ✔ Improve overall campaign performance
Deliverability Note
Link tracking adds a tracking layer to your URLs. While modern tracking is inbox-safe, consider these best practices:
- Avoid adding too many links in one email.
- Use clickable CTAs only where necessary.
- Maintain natural email formatting.
This helps ensure your emails continue landing in the primary inbox.
Open tracking
Email open tracking allows you to measure how many recipients are opening your cold emails. This metric is essential for understanding the performance of your sequences, improving subject lines, and testing email variations. When enabled, your campaign will display Open Rate data inside the Analytics dashboard.
Open tracking works by embedding a tiny, invisible tracking pixel inside each email. When a recipient opens your email, the pixel loads, and the system records the open event. If open tracking is disabled, your Open Rate will always show 0%, even if recipients are opening your emails.
Where to See Your Open Rate
You can view your campaign's open performance directly inside the Analytics tab.
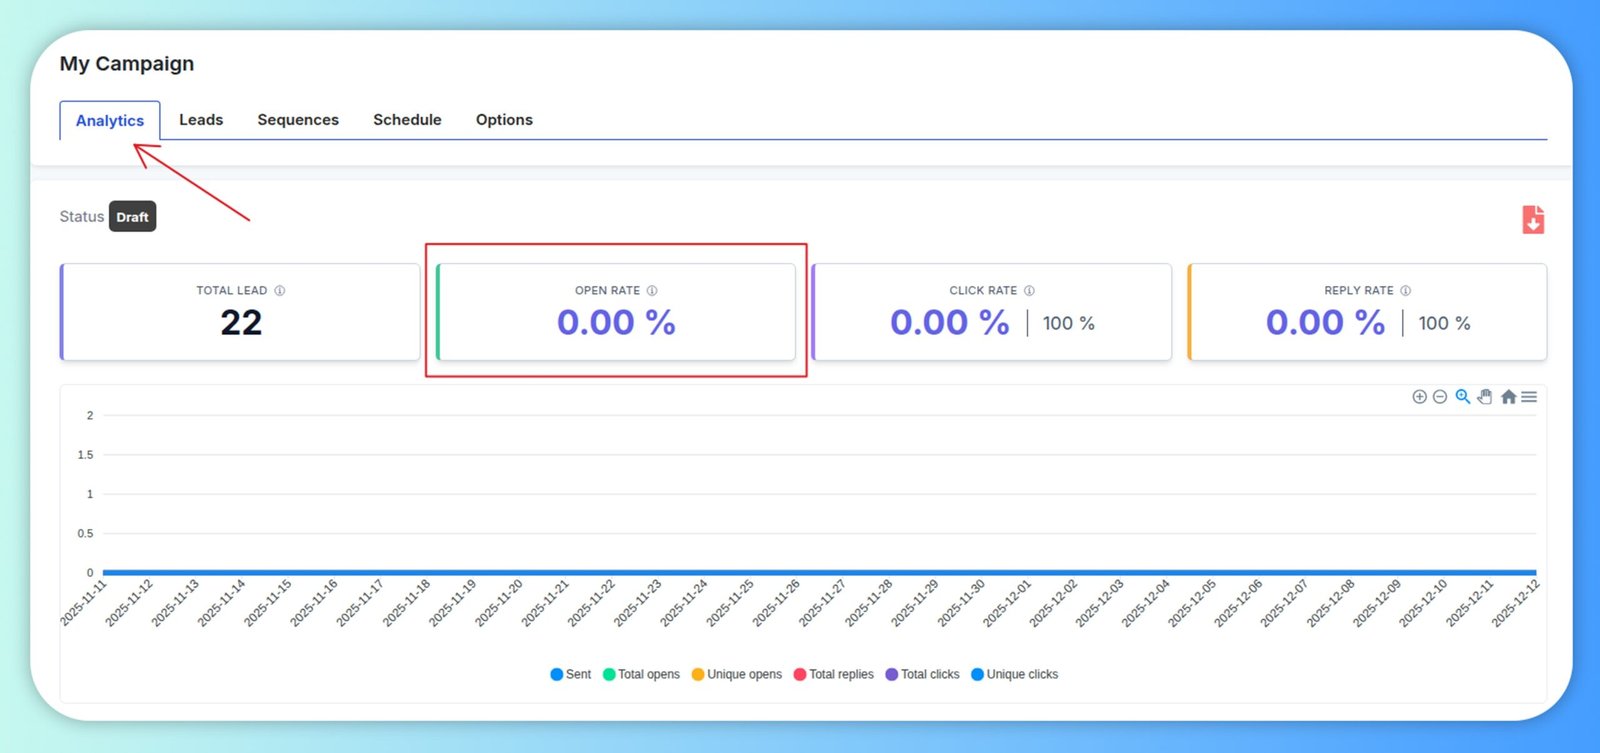
Inside the Analytics dashboard, the Open Rate card shows the total percentage of emails opened by your leads.
This includes:
- Total opens
- Unique opens
- Open rate percentage
- Open activity graph over time
If open tracking is disabled, this section will remain empty or display 0%.
How to Enable Open Tracking
To start tracking opens for your campaign, you must turn on open tracking from the campaign's Options tab.
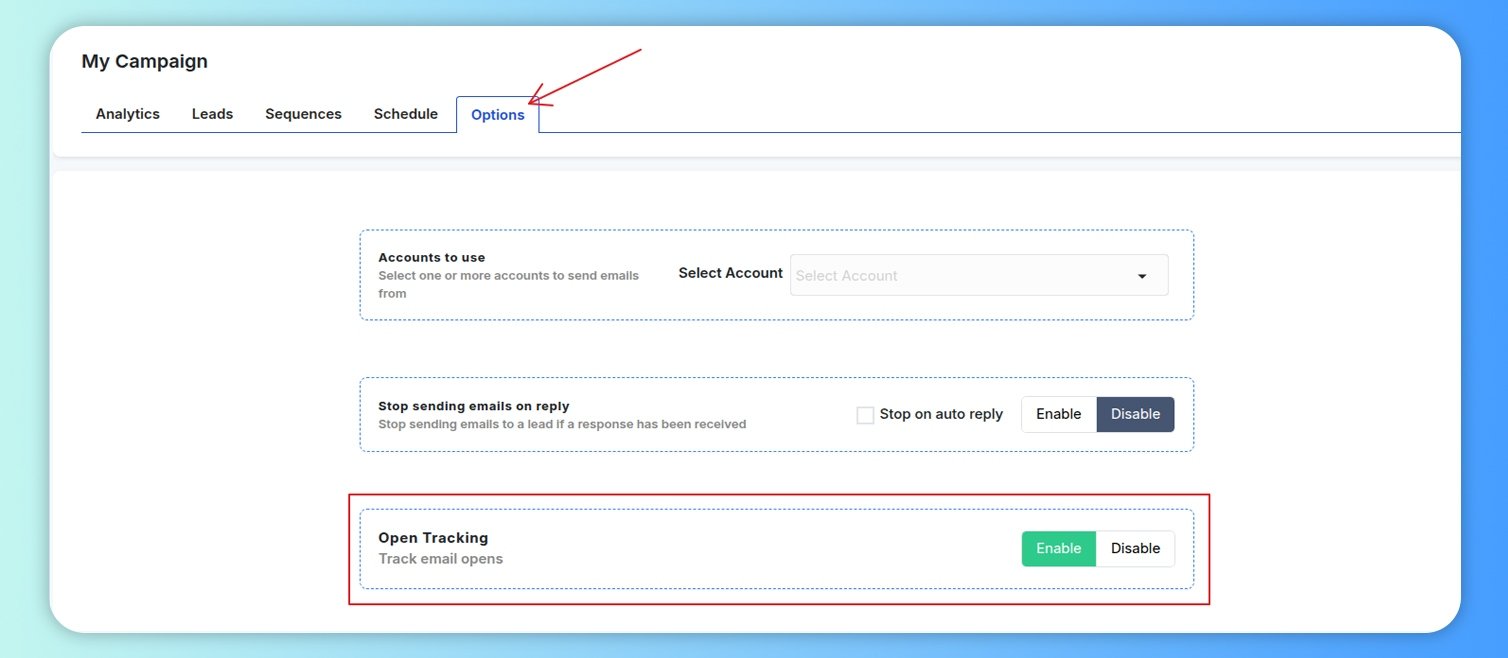
Steps to Enable Open Tracking:
- Go to your campaign and click the Options tab.
- Scroll down to the Open Tracking section.
- Click Enable to activate email open tracking.
- Save your campaign settings if required.
Once enabled, all future emails sent from this campaign will include the tracking pixel, allowing you to monitor open activity accurately.
Important Notes About Open Tracking
Open tracking is not 100% accurate because some email clients block images, which prevents tracking pixels from loading.
If accuracy is critical, consider combining open tracking with Click Tracking and Reply Tracking for fuller performance insights.
If open tracking is disabled, your open rate will always show 0%, regardless of actual opens.